skip to main |
skip to sidebar
In the last few weeks I had to travel by plane quite often for my work. I prefer hand luggage, but this means that there are restrictions on what I can take along. No scissors, no tweezers, things like that
My hotel is situated along a high way, so nowhere to go in the evening and I get easily bored watching TV every night, so I read a lot. After finishing all my e-books I had the idea to start drawing again. It had been so long, luckily I had brought my Bamboo iPad stylus
After some research I decided that SketchBook Pro would fit my drawing needs best. While playing around a bit, I was immediately intrigued by the symmetry button which sits quite prominently on the top ribbon and wanted to draw something using the option...Butterflies of course!
Since I haven't seen enough butterflies up close enough to draw one good enough from memory I searched Google for a nice photo of a Monarch butterfly (my favorite one after watching one of BBC's episodes of Great Migrations (I think... it was a documentary about Monarch's at least :) )
All I had to do was turn on the symmetry option (red circle) and draw a wing shape until finally I had a shape that I could use as a base
From Adobe Photoshop I was already used to the concept of Layers, incredibly useful! And thankfully, the image doesn't adjust when you turn the iPad upside down
Several layers, a lot of brush strokes and even more hand swipes (Undo) later I had created my first Monarch, actually having only focusing on the left part, the right part was created simultaneously by SketchBook. As you can see, I prefer a mildly rough way of drawing, not trying to make every line perfect
Another night, wanting to draw another butterfly, I chose the beautiful green New Guinea Birdwing to draw, again first searching a nice photo online. The problem was that I couldn't quite choose my colors in SketchBook to match the ones in the photo. Searching online some more for solutions, I came across an incredibly useful app called Palettes. It does exactly what the description says
"Palettes is a powerful productivity tool for creating and maintaining color palettes ... Grab colors from a photograph, a website ..."
So I loaded the photo from the Birdwing into Palettes and it automatically found the colors I needed
Now I only needed to remember the corresponding RGB code, use it in SketchBook and finally I had the green I was looking for. Below is the resulting butterfly, again taking about 1-2 hours to draw
I am very pleased with all the options of SketchBook Pro. Only downside of drawing on the iPad that I found for now: the stylus has quite a big diameter, so drawing small lines is difficult, because it usually doesn't end up on the exact location I wanted it. But this can be solved by zooming in quite a bit (except when the line will become very long and doesn't fit on your screen anymore when you zoom in). But it beats the price of those amazing Wacom Cintiqs ;)
Apparently I wasn't ready with making Pom Poms yet. In an older blog post I created Pom Poms from Tissue paper, but these have been made from wool. While visiting my mom last Mother's Day we were in the mood to 'be creative'. Being a Sunday, the stores were closed so we had to use whatever my mother had available...hence the wool.
I searched online what you can do with wool besides an form of knitting and came across several sites showing how to make small Pom Poms from wool while only using wool, a fork and scissors. Great! Easy, little mess and doesn't take hours. You only have to twist a string of wool about a fork a lot, tie it together with another string of wool, take it of the fork, cut the ends and trim the outside into a small sphere (see the pictures somewhat lower in the blog)
Having made a few, we didn't really know what to do with them, the cat wasn't interested... I don't really remember how, but suddenly I thought that they actually look a lot like a flower, they only needed a stem. Using some of the floral wire I had lying around I pushed one Pom Pom onto the end of about 20 cm of floral wire, and voila, a cute flower
So I made a bunch more, experimenting with the number of loops of wool around the fork.
- In the end between 50-75 loops worked best for the width of the fork I used.
- I experimented a bit with types of wool and found that you really need wool that can be stretched, otherwise you can't really tie a string around it tight enough for it to become a nice sphere.
- Finally, I found that not pulling on the string too much while wrapping it around the fork gave the best results
I made a really big one with 150 loops using something else than a fork, although I do not know the name for it, but in essence, it was 2-3 times wider than my fork. But these Pom Poms became so heavy, I had to twist two floral wires together to keep the wire from sagging. See the big one below
I am actually not satisfied with the grey vase in the photos. I think either a vase with a much smalle neck looks better, or a very high en medium wide cylindrical clear glass vase where I could place them completely into. Both of those options I don't have a spare of right now, though
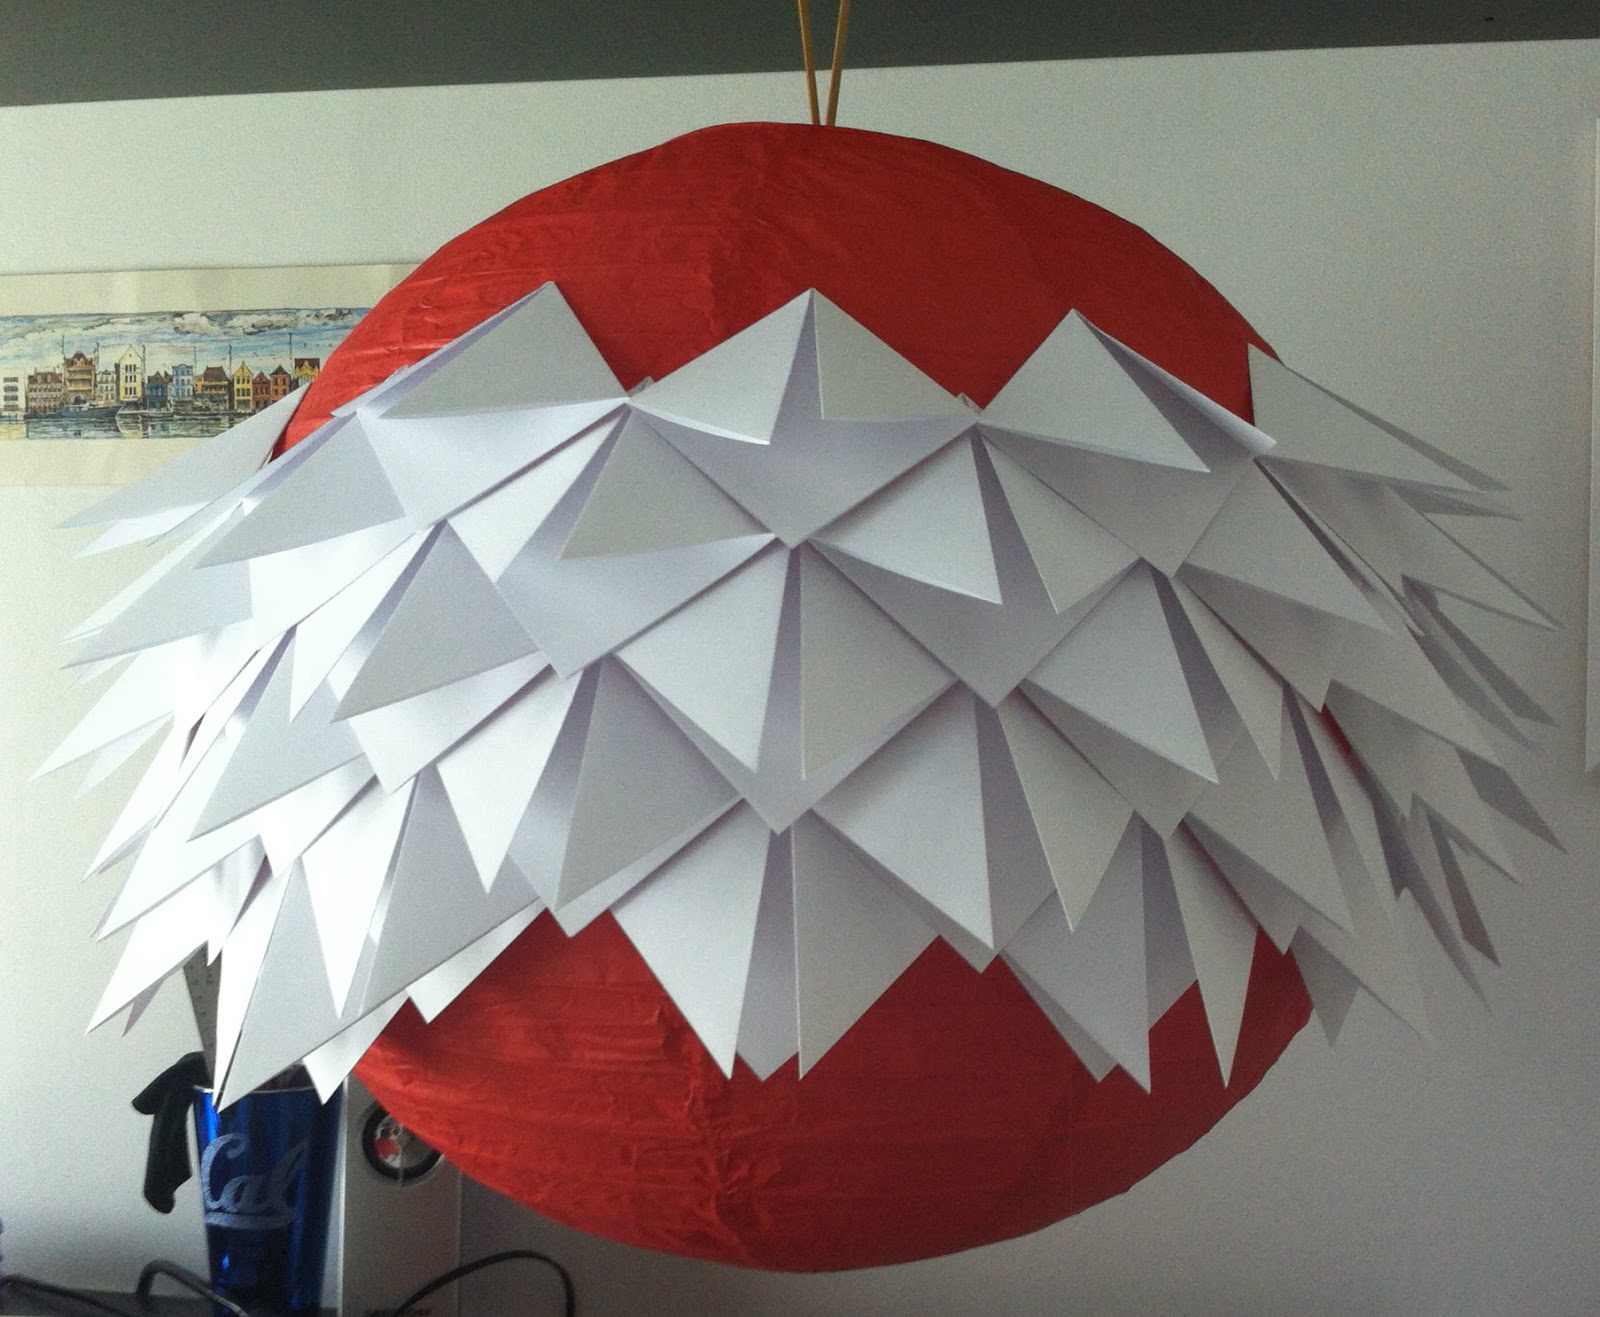
I actually had some leftover material from the lamp I created last month by folding over 500 fortune tellers which I then glued to a Chinese Lantern. One of the leftovers was a perfectly good 40 cm diameter Morup light from IKEA, but in red...
Still, I found another beautiful example of how you can turn an ordinary Chinese Lantern into an eye catcher with minimal cost on the 3 R's blog and wondered how the result would look by glueing white pendants to a red light (and, also important, I expected this to take considerably less time that the >> 40 hours I spend on the Fortune Teller lamp)
Although (and understandable) there is no explanation on how to create one for yourself on the original page (and therefore I'll try not to tell too much here), the fold can easily be understood by looking at the photos. So, I suspended the Red Chinese Lantern above my desk. Got out a stack of printer paper, paper cutter and of course a Glue Gun
After having folded about 100 Helmet bases I wasn't really sure where to start; top, middle or bottom? In the end I chose the middle so I would have the best location to know how many Helmets would fit on the widest part.
Going upward was very easy. However, once I finished the top and had to start glueing other Helmets below what was already on the lamp I was seriously questioning my idea of starting in the middle; I just didn't have enough hands to steady the lamp, hold up the Helmets and place a new Helmet right below the existing Helmets...
Eventually I used some elastic bands and a weight to have a flexible way to keep the lamp in place, top and bottom, when I tried to glue something on it. Not perfect, but at least I could get the job done with just my two hands :)
This light contains about 160 folded Helmet Bases (so 160 squares as big as you can make them if you take 2 per A4 sheets from 80 sheets) and about 20 small Helmet Bases (made from leftover white square memo sheets from the fortune teller light) to primarily glue on top and on the bottom to hide some leftover red from the paper lantern
I am guessing here, because I did not time myself (except that I could fold a nice Helmet Base in about 35 seconds), but I made this light during the course of about 4-5 days. A bit more time on the last day, but in all it probably took me approximately 8-9 hours
In the end, I am happy with the result. It is quite a unique looking lamp and I like the 'surprise' you get when you turn the light on and there is a warm red-orange glow coming from it, instead of yellow-ish
Still not the kitchen lamp I had set out to make before the Fortune Teller lamp, but perhaps I'll get there some day ;)